ecforceで特殊な対応事例をまとめてみる(備忘録)
今回はecforceのマイページトップで特殊な対応事例をまとめていきます(随時更新予定です)。
特殊な事例というのは、下記のテーマガイドに載っていない内容になります。
EC Force(ECフォース) MALL GUIDE テーマガイド
例えば、お知らせ一覧を掲載してほしいなどといった要望が意外とあります。
そんなときに、下記のお知らせ一覧のテーマガイドを参考にすれば動的に反映できるのではないかと思いがちなのですが、実はこのliquidのコードをそのまま反映してもマイページトップでは使うことができない仕様みたいです。
EC Force(ECフォース) MALL GUIDE テーマガイド
こういったことが、お知らせ一覧の掲載以外でも数多くあるので、これまで経験してきてよく使う事例を紹介していきます。
下記に紹介するコードの注意点としては、実装するページのテーマガイドに掲載している最低限必要なコードを記載した上で使ってください。まっさらな状態のファイルに下記のコードを貼っても動きません。
トップでニュースの該当カテゴリを最新順に3つ表示させる
<h3>ニュースの該当カテゴリを最新順に3つ表示</h3>
  <div>
    {% assign column_count = 0 %}
    {% for information in informations %}
    <div>
      {% if information.information_category.slug == "categoryの名前" %}
        <!-- 表示するニュースが3件に達したらループを終了 -->
        {% if column_count == 3 %}
          {% break %}
        {% endif %}

        <!-- ニュース記事サムネイル画像(任意) -->
        <a href="/shop/information/{{ information.slug }}">
          {% if information.thumbnail.url %}
            {% assign src = information.thumbnail.url %}
          {% else %}
            {% assign src = default_information_thumbnail_url %}
          {% endif %}
          <img src="{{ src }}">
        </a>

        <!-- ニュース記事タイトル(任意) -->
        <a href="/shop/information/{{ information.slug }}">{{ information.title }}</a>

        <!-- ニュース記事メタ情報(任意) -->
        <!-- 公開日時(任意) -->
        {{ information.published_at | date: '%Y.%m.%d' }}

        <!-- カテゴリ(任意) -->
        <a href="/shop/information_categories/{{ information.information_category.slug }}">{{ information.information_category.name }}</a>

        <!-- 表示されたニュースのカウントを増やす -->
        {% assign column_count = column_count | plus: 1 %}
      {% endif %}
    </div>
    {% endfor %}
トップで商品のラベルの該当タグを表示
こちらの注意点は、商品数が膨大になるとトップが重たくなるので注意です。無理に使わない方が無難だと思います。
<div>
    {% for product in products %}
      <!-- 該当タグがあるか確認 -->
      {% assign has_selected_tag = false %}
      {% for label in product.labels %}
          {% if label.name == "タグの名前" %}
              {% assign has_selected_tag = true %}
              {% break %}
          {% endif %}
      {% endfor %}
      <!-- 該当タグがある場合のみ商品を表示 -->
      {% if has_selected_tag %}
          <div class="product">
              <!-- 商品画像(任意) -->
              <a href="/shop/products/{{ product.master.sku }}">
                  {% if product.thumbnail.url %}
                      {% assign src = product.thumbnail.url %}
                  {% else %}
                      {% assign src = 'missing' | image_url %}
                  {% endif %}
                  <img src="{{ src }}">
              </a>
              <!-- 商品名 -->
              <a href="/shop/products/{{ product.master.sku }}">{{ product.name }}</a>
              <!-- 販売価格(任意) -->
              {{ product.first_price | number_to_currency: format: '%n %u' }}
          </div>
      {% endif %}
    {% endfor %}
  </div>
マイページトップで会員ランクの出し分け
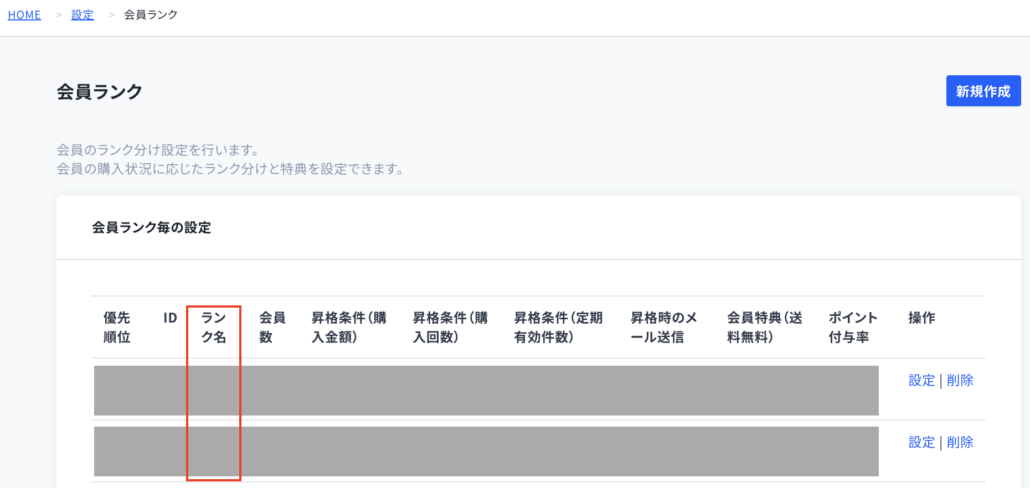
管理画面では、下記の場所になります。ここでランクの設定を終えている必要があります。今回はランク名をA、B、C、Dと設定しています。

続いてコードです。
current_customer.customer_rank.nameで上記画像の「ランク名」を取得できます。
あとはこのランク名がないときは「なし」と表示し、Aの場合は「A」のランクが表示されるといったように対応しています。
// spanタグは仮ですので、任意のタグを使用できます。

{% unless current_customer.customer_rank.name == 'A' or current_customer.customer_rank.name == 'B' or current_customer.customer_rank.name == 'C' or current_customer.customer_rank.name == 'D' %}
<span>なし</span>
{% endunless %}
{% if current_customer.customer_rank.name == 'A' %}
<span>A</span>
{% endif %}
{% if current_customer.customer_rank.name == 'B' %}
<span>B</span>
{% endif %}
{% if current_customer.customer_rank.name == 'C' %}
<span>C</span>
{% endif %}
{% if current_customer.customer_rank.name == 'D' %}
<span>D</span>
{% endif %}
マイページトップでお知らせ(ニュース)一覧を表示させる
お知らせ一覧は、よくトップページの更新欄にあるようなものだと思ってください。
お知らせ一覧の実装については、なかなか難しく理解できていない部分もありますので、コードを2パターン紹介します。
なぜ2パターンの紹介なのかというと、使っているテーマの影響によるのか実装できる場合とできない場合があったからです。原因が分かり次第、解説も交えていきたいと思っています。
パターン1
{% assign count = 0 %}
{% for category in information_categories %}
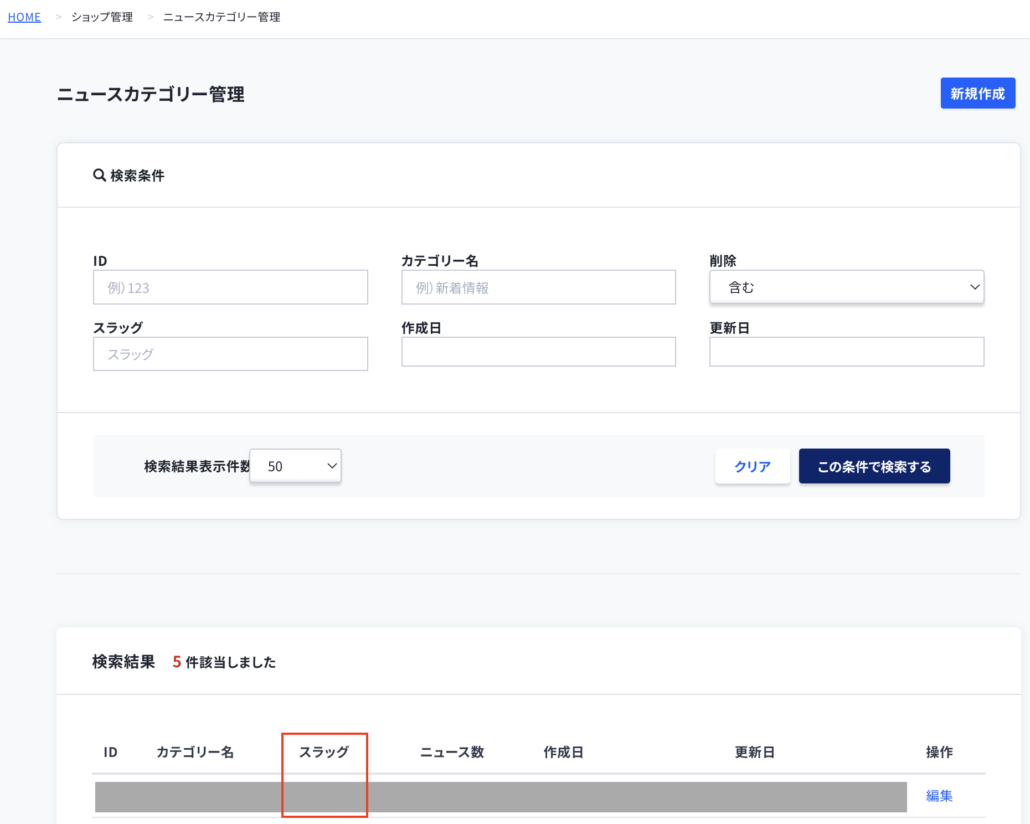
{% if category.slug == 'ニュースのカテゴリー名' %}  // ここでニュースカテゴリー管理のスラッグ名を指定
{% assign informations_sort = category.informations | sort: 'published_at' | reverse %}
{% for information in informations_sort | limit: 3 %} // ここで最大表示数を指定
<li>
  {{ information.published_at | date: '%Y年%m月%d日' }}<br>
  {{ information.title }}<br>
  <a href="/shop/information/{{ information.slug }}">詳細をみる</a>
</li>
{% assign count = count | plus: 1 %}
{% endfor%}
{% endif %}
{% endfor %}
{% if count == 0 %}
<li>
  現在のお知らせはありません。
</li>
{% endif %}
ニュースのカテゴリーで表示を制御しています。
category.slug == ‘ニュースのカテゴリー名’の「ニュースのカテゴリー名」は、管理画面の下記の画像の場所の文字列を記載してください。

limit: 3については、ニュースの最大表示数を制御できます。3の場合は最大3件表示されるようになっています。
パターン2
{% assign news_num = 0 %}
{% assign news_cat = '' %}
{% for category in information_categories %}
{% if category.slug == 'ニュースのカテゴリー名' %}
{% assign news_cat = category %}
{% for information in category.informations %}
{% unless information.state == 'inactive' %}
{% assign news_num = news_num | plus: 1 %}
{% endunless %}
{% endfor %}
{% endif %}
{% endfor %}
{% if news_num > 0 %}
<h2>
  ニュース一覧
</h2>
{% assign show_count = 0 %}
<ul>
  {% assign _informations = news_cat.informations | reverse %}
  {% for information in _informations %}
    {% unless information.state == 'inactive' %}
      {% assign show_count = show_count | plus: 1 %}
      <li>
        <a href="/shop/information/{{ information.slug }}">
          <p>{{ information.published_at | date: '%Y/%m/%d' }}</p>
          <p>{{ information.title }}</p>
        </a>
      </li>
    {% endunless %}
    {% if show_count >= 3 %}
      {% break %}
    {% endif %}
  {% endfor %}
  {% if show_count >= 3 %}
    <div>
      <a href="/shop/information_categories/ニュースのカテゴリー名">お知らせ一覧へ</a>
    </div>
  {% endif %}
</ul>
{% endif %}
こちらは変数でニュースの番号を0、カテゴリーを空欄にして、for文の中で、0が1ずつ増え、カテゴリーを設定したものに入れる処理が行われています。
assign _informations = news_cat.informations | reverseで逆順かつ_informationsがnews_cat.informationsに代入されるかたちになります。
あとはパターン1とほぼ同様の処理が行われています。
以上になりますが、自分でも難解でなんでこういう記述をする発想になるのかの理解ができていませんので、細かい解説はしません。
マイページトップで利用中の定期購入一覧を表示させる
マイページトップのテーマガイドには、通常商品の購入履歴一覧の実装方法は載っていますが、定期購入一覧の実装方法は載っていません。
定期注文一覧のテーマガイドを参考に実装しても反映されないため難解な場所だと思いました。
意外とクライアント側から要望がある部分ですので、下記にコードを紹介します。
<h2>{{ 'subs_orders.general.exist_subs_order.value' | t }}</h2>
<ul>
  {% if customer.subs_orders.size > 0 %}
  {% for subs_order in customer.subs_orders %}
  {% if subs_order.scheduled_to_be_delivered_at and subs_order.human_state_name == "有効" %}
  <li>
    <p>注文番号</p>
    <a href="/shop/customer/subs_orders/{{ subs_order.number }}">{{ order.number }}</a>

    <p>次回配送予定日</p>
    <time>{{ subs_order.scheduled_to_be_delivered_at | date: "%Y/%m/%d" }}</time><br>
    <a href="/shop/customer/subs_orders/{{ subs_order.number }}#baseinfo">配送スケジュールページへのリンク</a>

    <p>次回ご注文金額</p>
    <p>{{ subs_order.subtotal | number_to_currency: format: '%n %u' }}</p>

		// 下記はデフォルトのclassをつけたままにしています
    <div class="p-history_list__item__detail">
      {% for item in subs_order.order_items %}
      <div class="c-cart_item u-color__border--border">
        <a class="c-cart_item__img" href="/shop/products/{{ item.product.master.sku }}">
          {% if item.variant.thumbnails.first.url %}
          {% assign thumbnail = item.variant.thumbnails.first.url  %}
          {% elsif item.product.master.thumbnails.url %}
          {% assign thumbnail = item.product.master.thumbnails.url  %}
          {% elsif item.product.thumbnail.url %}
          {% assign thumbnail = item.product.thumbnail.url  %}
          {% else %}
          {% assign thumbnail = 'missing' | image_url  %}
          {% endif %}
          <div class="c-cart_item__img__inner" style="background-image:url('{{ thumbnail }}')"></div>
        </a>
        <div class="c-cart_item__info">
          <a class="c-cart_item__info__title u-text--subhead" href="/shop/products/{{ item.product.master.sku }}">
            {{ item.product.name }}</a>
          <div class="c-cart_item__info__variant u-text--body">
            {% assign option_cnt = 0 %}
            {% for option_value in item.variant.option_values %}
            {% unless option_cnt == 0 %}
             /
            {% endunless %}
            {{ option_value.option_type.presentation }}:
            {{ option_value.presentation }}
            {% assign option_cnt = option_cnt | plus: 1 %}
            {% endfor %}
          </div>
        </div>
      </div>
      {% endfor %}
    </div>
  </li>
  {% endif %}
  {% endfor %}
  {% else %}
  <li class="p-history_list__item u-text--body">
    <p>
      {{ 'subs_orders.general.no_recurring_product.value' | t }}
    </p>
  </li>
  {% endif %}
</ul>
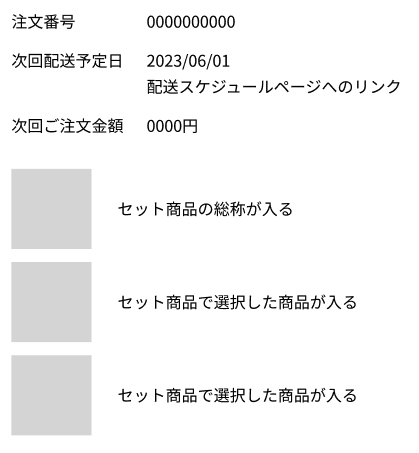
この実装でどういう見た目になるのかというと、CSSの調整ももちろんしなければならないのですが、イメージとしては下記の感じになります。

subs_ordersというのが定期商品扱いになります。
やっている事自体は、通常商品の購入履歴一覧とあまり変わらないと思いますので、解説は省略します。
マイページトップで人気(おすすめ)商品を表示させる
下記のコードになるのだが、自分でも理解できていない部分があるので、解説はできません。
sort: ‘option01’がどこから引っ張ってきているのかが読み解けなかったため、それが読み解ければ解説できそうです。
<h2>人気商品一覧</h2>
<ul>
  {% assign products = products | sort: 'option01'  %}
  {% for product in products limit:3 %}
  <li>
    {% if product.thumbnail.url %}
    {% assign src = product.thumbnail.url %}
    {% else %}
    {% assign src = 'missing' | image_url %}
    {% endif %}
    <img src="{{ src }}" alt="">
    <p>{{ product.name }}</p>
    <p>{{ product.first_price | number_to_currency: format: '%n' }}</p>
    <a href="/shop/products/{{ product.master.sku }}">商品詳細ページへ</a>
  </li>
  {% endfor %}
</ul>
商品詳細で親カテゴリで条件分岐して3つ表示
    <h3>親カテゴリで条件分岐して3つ表示</h3>
    {% assign _category = '' %}
    {% for category in product.product_categories %}
      {% if category.product_category_visibility %}
          {% unless _category == '' %}
              {% assign _category = _category | append: ', ' %}
          {% endunless %}
          {% assign _category = _category | append: category.name %}
          {% if category.name == 'カテゴリ1' %}
            <p>カテゴリ1の商品1つめ</p>
            <p>カテゴリ1の商品2つめ</p>
            <p>カテゴリ1の商品3つめ</p>
          {% endif %}
          {% if category.name == 'カテゴリ2' %}
            <p>カテゴリ2の商品1つめ</p>
            <p>カテゴリ2の商品2つめ</p>
            <p>カテゴリ2の商品3つめ</p>
          {% endif %}
      {% endif %}
    {% endfor %}
商品詳細のOGP設定
下記のように条件分岐すれば対応可能です。商品の設定画面で入れた画像がOGPになります。
// 対象ファイル:_head.html.liquid

{% if params["controller"] contains "shop/products" %}
<!-- ここは商品詳細のOGPです -->
<meta property="og:image" content="{{ product.thumbnail.url }}">
{% else %}
<!-- ここは商品詳細以外のOGPです -->
<meta property="og:image" content="{{ og_image | strip }}">
{% endif %}
カテゴリー詳細で子カテゴリーを呼び出す
{% for category in product_categories %}
    {% if category.parent.name == product_category.name %}
        {% unless category.name == category.parent.name %}
            <a href="/shop/product_categories/{{ category.slug }}" >{{ category.name }}</a>
        {% endunless %}
    {% endif %}
  {% endfor %}


下記でやると外側のタグをCSSでコントロールできる
{% assign has_child_categories = false %}
  {% for category in product_categories %}
  {% if category.parent.name == product_category.name and category.name != category.parent.name %}
  {% assign has_child_categories = true %}
  {% break %}
  {% endif %}
  {% endfor %}

  {% if has_child_categories %}
  <div class="bl_child_category_list">
    {% for category in product_categories %}
    {% if category.parent.name == product_category.name %}
    {% unless category.name == category.parent.name %}
    <a href="/shop/product_categories/{{ category.slug }}">
      {{ category.name }}</a>
    {% endunless %}
    {% endif %}
    {% endfor %}
  </div>
よくある質問のアンカーリンク設定
{% for faq in faqs %}
      <a href="#faq{{ forloop.index | prepend: "0" }}">{{ faq.title }}</a>
    {% endfor %}

    {% for faq in faqs %}
            <dl class="p-faq__inner__list__item u-color__border--border">
              <!-- よくあるご質問項目 タイトル -->
              <dt class="p-faq__inner__list__item__question u-color--head">
                <span class="u-text--subhead">Q</span>
                <pre class="u-text--strong" id="faq{{ forloop.index | prepend: "0" }}">{{ faq.title }}</pre>
                <i class="u-icon--plus"></i>
                <i class="u-icon--minus"></i>
              </dt>
              <!-- よくあるご質問 項目内容 -->
              <dd class="p-faq__inner__list__item__answer">
                <span class="u-text--subhead">A</span>
                <pre class="u-text--body">{{ faq.text }}</pre>
              </dd>
            </dl>
          {% endfor %}
該当ページのみに適用させたい場合
{% if params["controller"] contains "shop/customer/" %}
	// ここに内容を記載
	// この例の場合、shop/customer/のすべてのページ、つまりマイページ内に適用される
{% endif %}
{% if params["controller"] contains "shop/faq" %}
	// ここに内容を記載
	// この例では、faqページに適用される
{% endif %}

動かない場合は下記でも対応可
{% assign url_path = page_url | remove: site_url %}
{% if url_path contains '/shop/pages/about' %}
  aboutページのみに表示する記述
{% endif %}
該当ページ以外で適用したい場合
{% assign url_path = page_url | remove: site_url %}
{% unless url_path contains '/shop/order/new' or url_path contains '/shop/order/confirm' %}
 // ここに内容を記載
{% endunless %}
読み込み時に一瞬崩れる
デフォルトの仕様らしいのですが、jQueryを当てはめると改善はできます。
$(function() {
      $('.header_nav_cont').fadeIn(0);
    });
フリーページ上でカートに遷移せずに商品を追加する方法
下記公式にやり方が載っています。
lineid連携
{% if line_settings['display_btn'] == '1' and current_customer.line_id? == false %}
            <p class="line-auth-yet">※ LINE ID連携が完了しておりません ※</p>
            <p class="line-auth-yet-caution">管理上のためご対応のほどお願いいたします。</p>
            {% comment %}
            <div class="alert">
              {{ line_settings['information_context'] }}
            </div>
            {% endcomment %}
            <!-- LINE ID 連携ボタン(リンク) -->
            <div class="line_new_ec">
              <div class="button-container">
                <a class="button btn-line line-token-set-btn" href="#">
                  <span class="before-btn-line"></span>
                  LINE ID連携をする
                </a>
              </div>
            </div>
            {% else if line_settings['display_btn'] == '1' and current_customer.line_id? == true %}
            <p class="line-auth-success">LINE連携済みアカウントです。</p>
            {% endif %}
クレジットカードページでボタンを押しても動かない場合
使っているテーマが古い状態の場合に多いです。これもjQueryを使っています。
<script>
$(function(){

  // カード情報追加アコーディオン
  let toggleBtn = $('.p-payment_list__add__btn, .p-account__inner__content__form__bottom__link')
  toggleBtn.on('click', function(){
    $('.p-payment_list__add__win').slideToggle();
  });

  // 必須マーク*を整形
  let requiredTag = $('.c-form_table .u-color__text--alert');
  if(requiredTag.length > 0) {
    requiredTag.html('必須');
    requiredTag.css({
      display: "inline-block",
      margin: "0 0 0 5px",
      padding: "3px 8px",
      background: "#C14444",
      color: "#fff",
      fontSize: "10px",
      borderRadius: "99rem"
    });
  }
});
</script>
商品カテゴリー詳細のバナーを出し分ける案
SPはファイルアップロードから読み込ませ、PCは管理画面で登録したバナーを読み込ませる。
<div class="bl_main_bnr">
    <img srcset="{{ file_root_path }}/products/sp_category_bnr/{{ product_category.slug }}.png 719w, {{ product_category.thumbnail.url }}" alt="{{ product_category.name }}">
  </div>
商品カテゴリー詳細で親カテゴリーページの時に子カテゴリーを表示する方法
{% assign has_child_categories = false %}
  {% for category in product_categories %}
  {% if category.parent.name == product_category.name and category.name != category.parent.name %}
  {% assign has_child_categories = true %}
  {% break %}
  {% endif %}
  {% endfor %}

  {% if has_child_categories %}
  <div class="bl_child_category_list">
    {% for category in product_categories %}
    {% if category.parent.name == product_category.name %}
    {% unless category.name == category.parent.name %}
    <a href="/shop/product_categories/{{ category.slug }}" class="">
      {{ category.name }}</a>
    {% endunless %}
    {% endif %}
    {% endfor %}
  </div>
  {% endif %}
以上になります。
まだまだ分からない部分が多いですが、備忘録として残しておくことで困っている方々の役に立てると幸いです。


